How to: Export your InDesign Document with in5
Ajar Productions' in5 extension converts InDesign documents to live HTML5.
With the right export settings, you can upload this HTML to Ubiquity as rich, interactive app content.
Before exporting, open the InDesign document you want to upload to Ubiquity, and double check you're completely happy with your document.
If you want to include document-to-document links within your InDesign document, make sure you configure all of your documents accordingly prior to exporting.
For more information on document-to-document links, see How to: Create Document-to-Document Links with in5.
The in5 Export Panel
To open the in5 export panel, open the file menu, then click Export HTML5 with in5.

This will open the in5 export panel. There are several tabs to the left of the panel. You will work your way through these tabs, as follows:
Basic Tab
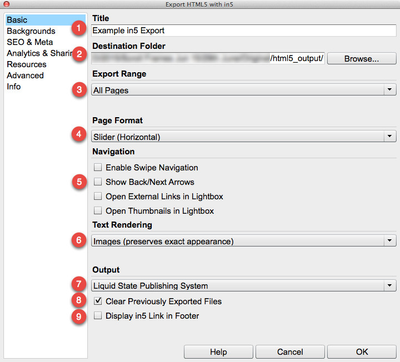
- Give your export a Title
- Choose your export Destination Folder
- Leave the Export Range as All Pages, or manually enter a page range
Choose the Slider (Horizontal) option from the Page Format dropdown
If you originally created the document for Adobe DPS, and the InDesign document already uses Liquid Layout rules from the DPS panel, we recommend you instead use the Liquid page format option.
- Deselect all Navigation options
From the Text Rendering dropdown menu, choose HTML with Local Font Embedding, or Images (Preserve exact appearance)
Exporting text as HTML allows for live, selectable text, but requires appropriate font licensing and may require layout tweaks.
Exporting text as images allows for greater design replicability, and is often a simpler process. However, choosing this option will mean your text is not selecteable or searchable.
An full explanation of the different types of text rendering available through in5 can be found in Ajar Productions' in5 help documentation.
- From the Output dropdown menu, choose Liquid State Publishing System
- Untick the Display in5 Link in Footer option
- Tick the Clear Previously Exported Files option
Backgrounds Tab
If you are importing your content in to an existing Liquid State Ubiquity app, you should use the Backgrounds tab to ensure the background colour of your in5 output matches the background colour you have set for your app.
SEO & Meta
You will only need to configure options here if you intend to use document-to-document links within your app.
For more information, see How to: Create Document-to-Document Links with in5
Resources
You will only need to configure options here if you intend to attach additional files as links within your app.
An example can be seen here: How to: Link to a PDF with in5.
Advanced
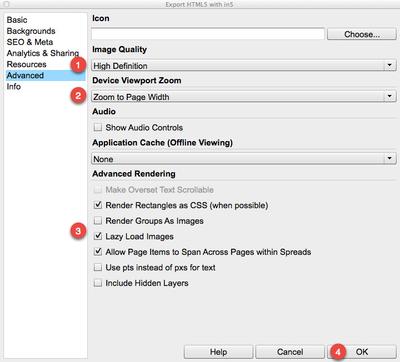
- Set the Image Quality of your export. We recommend using the High Definition option.
- Choose the Zoom to Page Width option from the Device Viewport Zoom dropdown
Under the Advanced Rendering heading, select the following options: Make Overset Text Scrollable (if available), Render Rectangles as CSS, and Allow Page Items to Span Across Pages within Spreads.
The Make Overset Text Scrollable option is only available if you are exporting your text as HTML. Text exported as images cannot be selected or searched.
In some cases, you may also want to use the Render Groups as Images option.
- Once you have configured all of the in5 export panel tabs, click the OK button to start the export process.
Uploading your in5 HTML to Ubiquity
in5 versions 2.2 and up will export your document as a .zip file containing HTML files. This .zip file will be saved in your chosen export destination.
You can import this .zip file directly to Ubiquity.
For more information, see How to: Import App Content.
Users on older versions will need to compress their export folder before uploading.
Navigate to your chosen export folder. Your content will be exported as a folder of HTML files, called Book. Compress the folder by converting it to a .zip file.

To zip a folder on a Windows computer, right-click on the folder and choose Send To > Compressed file from the menu.
To zip a folder on a Mac computer, control-click on the folder and choose Compress from the menu.
You can import this compressed .zip file to Ubiquity.
Unless otherwise indicated in the Overview page of this WIKI the information contained within this space is Classified according to the /wiki/spaces/ISMS/pages/739344530 as |
INTERNAL |